Memory Upgrade on a computer or laptop is sometimes feared by many to be a very technical process. In this article we will break down the whole process of upgrading memory to make it very simple and we will make sure to explain it in simple steps.
We will be looking at some of these important topics like :
What is RAM?
When to Upgrade Memory?
Does your system need a Memory Upgrade?
Know your system: How to know how much RAM is already installed and How to determine the right RAM?
Purchasing RAM Memory
Installing Memory
What is RAM?

RAM stands for Random Access Memory. In simple terms, this is a type of temporary memory used to store and read data from the time your system starts. A computer consists of the core heart of all its hardware components called the CPU or Processor. The RAM is used by the CPU to store and retrieve information called data, the storage and retrieval takes places in nanoseconds. The speed of reading and storing data between the CPU and RAM is called the bus speed. The faster the bus speed the faster the data is read and stored. The amount of data that can be read and stored in the RAM depends on the size of the RAM.
So speed and size of the RAM is an important factor to determine a computer's performance. A systems overall performance improvement is seen when RAM is of the optimal speed and size, in the same way a system performance lags when the amount of RAM and its speed is not optimal.
When to Upgrade RAM?
When you buy a new Computer or Laptop it comes with standard amount of RAM memory installed. The amount of RAM can vary from different brands, some may come installed with 1GB, some with 2GB or 4GB of standard memory. The amount of memory already installed depends on the type of system you have. Todays newer PCs and Laptops can take up-to a max of 8GB to 16GB or even 32GB. These newer systems come with 2GB to 4GB of standard memory.
The standard memory that comes installed with your system sometimes may not be just enough to run all newer softwares and apps at optimal speed. If you want to run your computer faster, the two main hardware components as discussed earlier are the CPU or processor and RAM. When a system CPU is running short of adequate memory space to read and store data you will start to notice your system performing very slow with long start up time, and delayed response while running softwares and other apps. This is the time when you should definitely consider a memory upgrade.
Does your system need a Memory Upgrade?
We recently upgraded a series of computers in our company to the max RAM it supported, it really felt like we were using new systems entirely. You’ll really be amazed at the power of this simple, affordable RAM upgrade process. You do not need to be tech savvy to do a memory upgrade. With the help of your fingers with a small screwdriver, you should be able to upgrade your own system RAM with no help.
How to know how much RAM is already installed?
The first thing you will need to know before you begin a RAM upgrade is to get to know the technical information about your system. This is like finding what material is needed and how much is needed before you start to build a new house. The difference here is you will be able to do it in just few simple steps.
If your computer or laptop OS is Windows XP, Vista or 7, the following steps can pull your system info.
1. Click "Start" on the Taskbar.
2. Click on Control Panel.
3. Click on System.
In the system info, you can see the Installed memory(RAM) size (note: here you will not be able to find the type and speed of the memor installed).
For Apple Mac.
Click on the Apple icon in the top left of your screen and select “About This Mac” from the options. A small window should pop up with processor and memory installed info.
The memory information that you see here will not be accurate, do not worry just note down your memory information from this window. We’ll use this information later to determine which RAM to buy.
How to determine the right RAM?
Finding the type, size and number of memory modules installed on a windows PC.
Now that you know the average amount of memory that is already installed on your system, you will now need to know the exact type, size and number of memory modules you already have installed on your system, you will need to know this before you go to the next step of purchasing memory.
A very good software to get this job done very easily is called CPUZ. This software can be downloaded and installed from the following link...
http://www.cpuid.com/downloads/cpu-z/1.64-setup-en.exe
After downloading, install and run the software. Running the software will start a hardware scan which may take a new minutes. When the hardware scan is done it will open up a window with the hardware report. The info you will need now is just what it shows up in the tab called SPD.
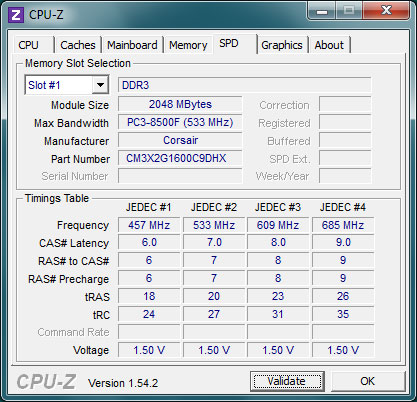
The screen shot of the SPD tab looks like this...

In this windows you will see the option called Memory Slot Selection, this will list all the slots that the system has for memory installation. Selecting the slot# will show the exact memory type, size, speed of memory installed in the memory slot.
In the screen shot the Slot#1 shows Memory Size 2048MBytes which is 2GB, type: DDR3, max bandwidth: PC3-8500 and more info about the memory module installed in slot#1 is listed below it. Click through all the slot#s that are listed here and note down each size and type installed in all the slots.
Finding the type, size and number of memory modules installed on Apple MAC.
Click on the little Apple icon in the very top left of your screen and select “About This Mac” from the options. The window should pop up.

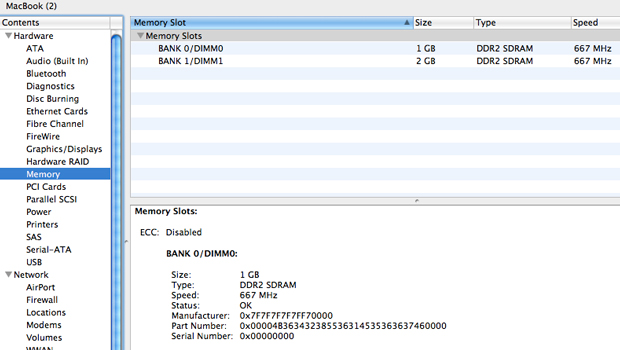
Hit the button that says “More Info.” This will take you into an application called “System Profiler” that contains all kinds of technical information about your Mac. As you can see below, down the left side there is a series of categories. Click on “Memory” under the “Hardware” heading.
To the right you’ll see a bunch of information about the RAM. Here you can see everything from type and speed to serial and part numbers. The information we’re really after at this point is how many memory slots you have and what is currently in them. Note them down.
Now that you know the amount of RAM already installed, the type and size in each slot, lets go to the final process of purchasing the memory.
Purchasing RAM Memory.
It is a fairly simple step to purchase memory. Go to the homepage of www.memorystock.com and enter the model name or even the motherboard model (if you have an assembled PC) in the Search Model field.

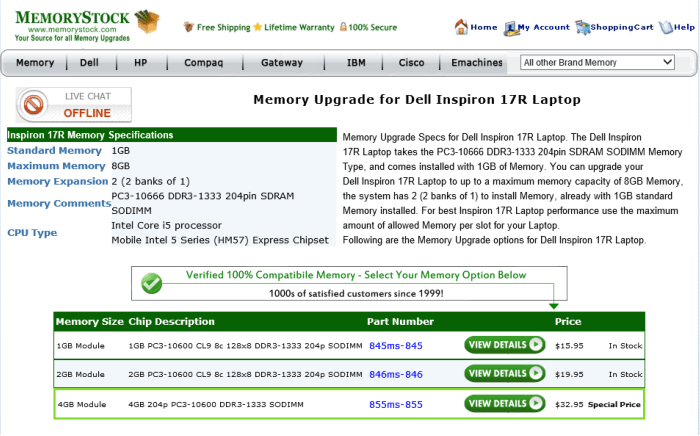
If you are not sure of the model name or motherboard model then run the Scan Software found on the homepage. The report will show the model name and motherboard model. Entering the model name in the search field will show up the model specification page link. Clicking on this link will take you to the memory specification details for your system. The following is the screen shot of the memory specification for the Dell Inspiron 17R Laptop as an example.

Lets check the memory specification for this system. The specs says "The Dell Inspiron 17R Laptop takes the PC3-10666 DDR3-1333 204pin SDRAM SODIMM Memory Type, and comes installed with 1GB of Memory. You can upgrade your Dell Inspiron 17R Laptop to up to a maximum memory capacity of 8GB Memory, the system has 2 (2 banks of 1) to install Memory"
You already know the amount of memory that is installed on your system from previous steps. The main thing to check now is the max memory that your system can take. For the above Dell Inspiron Laptop memory you can see the max memory that it can support is 8GB, and it has a total of 2 slots to install the memory. So dividing the 2 slots with the max amount of memory supported will tell you how much can be installed max per slot, here it is 8GB / 2 = 4GB.
If the amount of total memory that you have installed in each slot is lesser than what your system supports max, then you have the option to add up more memory if you have free memory slots or replace the existing memory if you do not have memory slots left for upgrade. This should be cross-checked and chosen based on the amount of memory each slot supports and what you already have and the number of slots you have free to install any more memory.
Once you cross-check all the details and choose the memory you want to buy, just click on the memory part number it shows below. As you see from the above screen-shot the part number for the 4GB Module is the 855ms-855, clicking on this will take you to the order page where you can continue to place the order.
Once you place the order for the memory type you choose, you should have the memory in your hand in few days based on the shipping method you choose.
Memory Installation.
How to install computer, laptop memory?
Installing computer or laptop memory RAM is a fairly straightforward process that usually only takes 5-10 minutes and a small screwdriver.
The following guides from memory stock will help you with this process.
Computer Memory Installation Guide
Older 168-pin SDRAM Computer Installation Guide
200-pin SO-DIMM Laptop Memory Installation Guide
Older 144-pin SO-DIMM Laptop Memory Installation Guide
General SIMM Installation Guide (very old pcs)
4be9ae01-8f05-44b4-8c5d-e9ca7ba33c80|9|3.9
Upgrading Memory, how to upgrade memory, installing memory